The Cameo Camper Renovation: Backlit Shower Walls Part 5
Y’ALL. We’re getting so close to the bathroom being complete!
Last time we shared how we made the structural supports for our shower fixtures and plumbed for our shower and toilet.
Today we’re continuing our wet bath tutorial series by FINALLY installing our frosted acrylic wall panels and showing how we gave it this glow:

Our backlit shower walls (part 5) shopping list
Acrylic wall panels – see material list for panels previously created in part 1
PEX cutter tool – for 1/2” PEX pipe
Paint thinner + lint-free rag
Silicone
Caulk gun
Painters tape
Scrap of drywall/plywood, step stool, paint cans, car jack, etc. – to use to brace the ceiling panel while it dries
Coming into today, we’ve already made our acrylic panels, framed our shower, run the electrical, and plumbed our toilet and shower and prepped for our brass shower fixtures.
Acrylic panel prep + order of installation
Though we installed our acrylic wall panel framing before tiling the floor – see part 2 and part 3 – we installed our acrylic walls after we laid and grouted the tile floor so the water rolls off of the walls and onto the tile, versus tiling the wall up to the side of the acrylic where water could be encouraged to follow down the wall and run underneath the tile floor. (Which should really be an issue since we have waterproofing under the tile … but why encourage water to go where you don’t really want it…)
First we dry fit our acrylic wall panels in place, marking out the shower fixture supports and plumbing (shared in part 4) where we needed to drill holes for the toilet and shower plumbing to come through.

A note on the order of things
(Really we did the structural support Sharpie-marking and hole-drilling a long time ago, back when we made our panels (before we painted them so we could see through them).
This is one of those projects where there is no nice and neat, easy-to-share-in-order, linear path where you do things of like nature together. This bathroom is very much a “do a little bit of A, then B, then C, then some more A, followed by H, then some more C, then maybe some B again…” type of project … but it doesn’t really make coherent sense for me to share this whole bathroom build series with you in that order because no one in their right mind would understand it.)
So in other words, after you do the things covered in the previous four parts of the series – not necessarily in that order since the steps in each kind of intermingle with each other and with our shower floor pan build – you’re ready to actually install the walls.
Installing the acrylic panels
With our holes drilled in the acrylic walls, panels dry fit, painted and 100% ready for install, we vacuumed and wiped all of the PVC support rails with paint thinner to remove dust and oils and let them dry.
In the meantime, (with water turned off/not hooked up) we used the PEX cutter to cut off the temporary cap we used to plug the PEX line leading to the toilet last time, making sure to leave extra length for later but not so much that we couldn’t maneuver the acrylic panels around it during install.
Installing the ceiling panel
First, we squoze a bead of silicone around the ceiling perimeter (on the downward-facing side of the angled supports) and along the plus-shaped supports we’d placed in the center of the ceiling, doing our best to not get it in our hair.

Then we carefully and firmly pressed the ceiling panel against it (paint-side up toward the roof), applying pressure along the siliconed supported areas only. We used painters tape to help hold the panel in place until we came up with a much better idea:

Using a makeshift support from a slab of drywall (cut slightly smaller than the ceiling, a jack that came with the camper, four paints cans, and a step stool, we applied equal consistent upward pressure to the ceiling while the silicone dried overnight.
Installing the Wall panels
After the ceiling panel was glued in place, we carefully peeled back the protective film along the edges just enough to expose a little more than where the wall panels would touch it to avoid the film being permanently glued down on the edges.
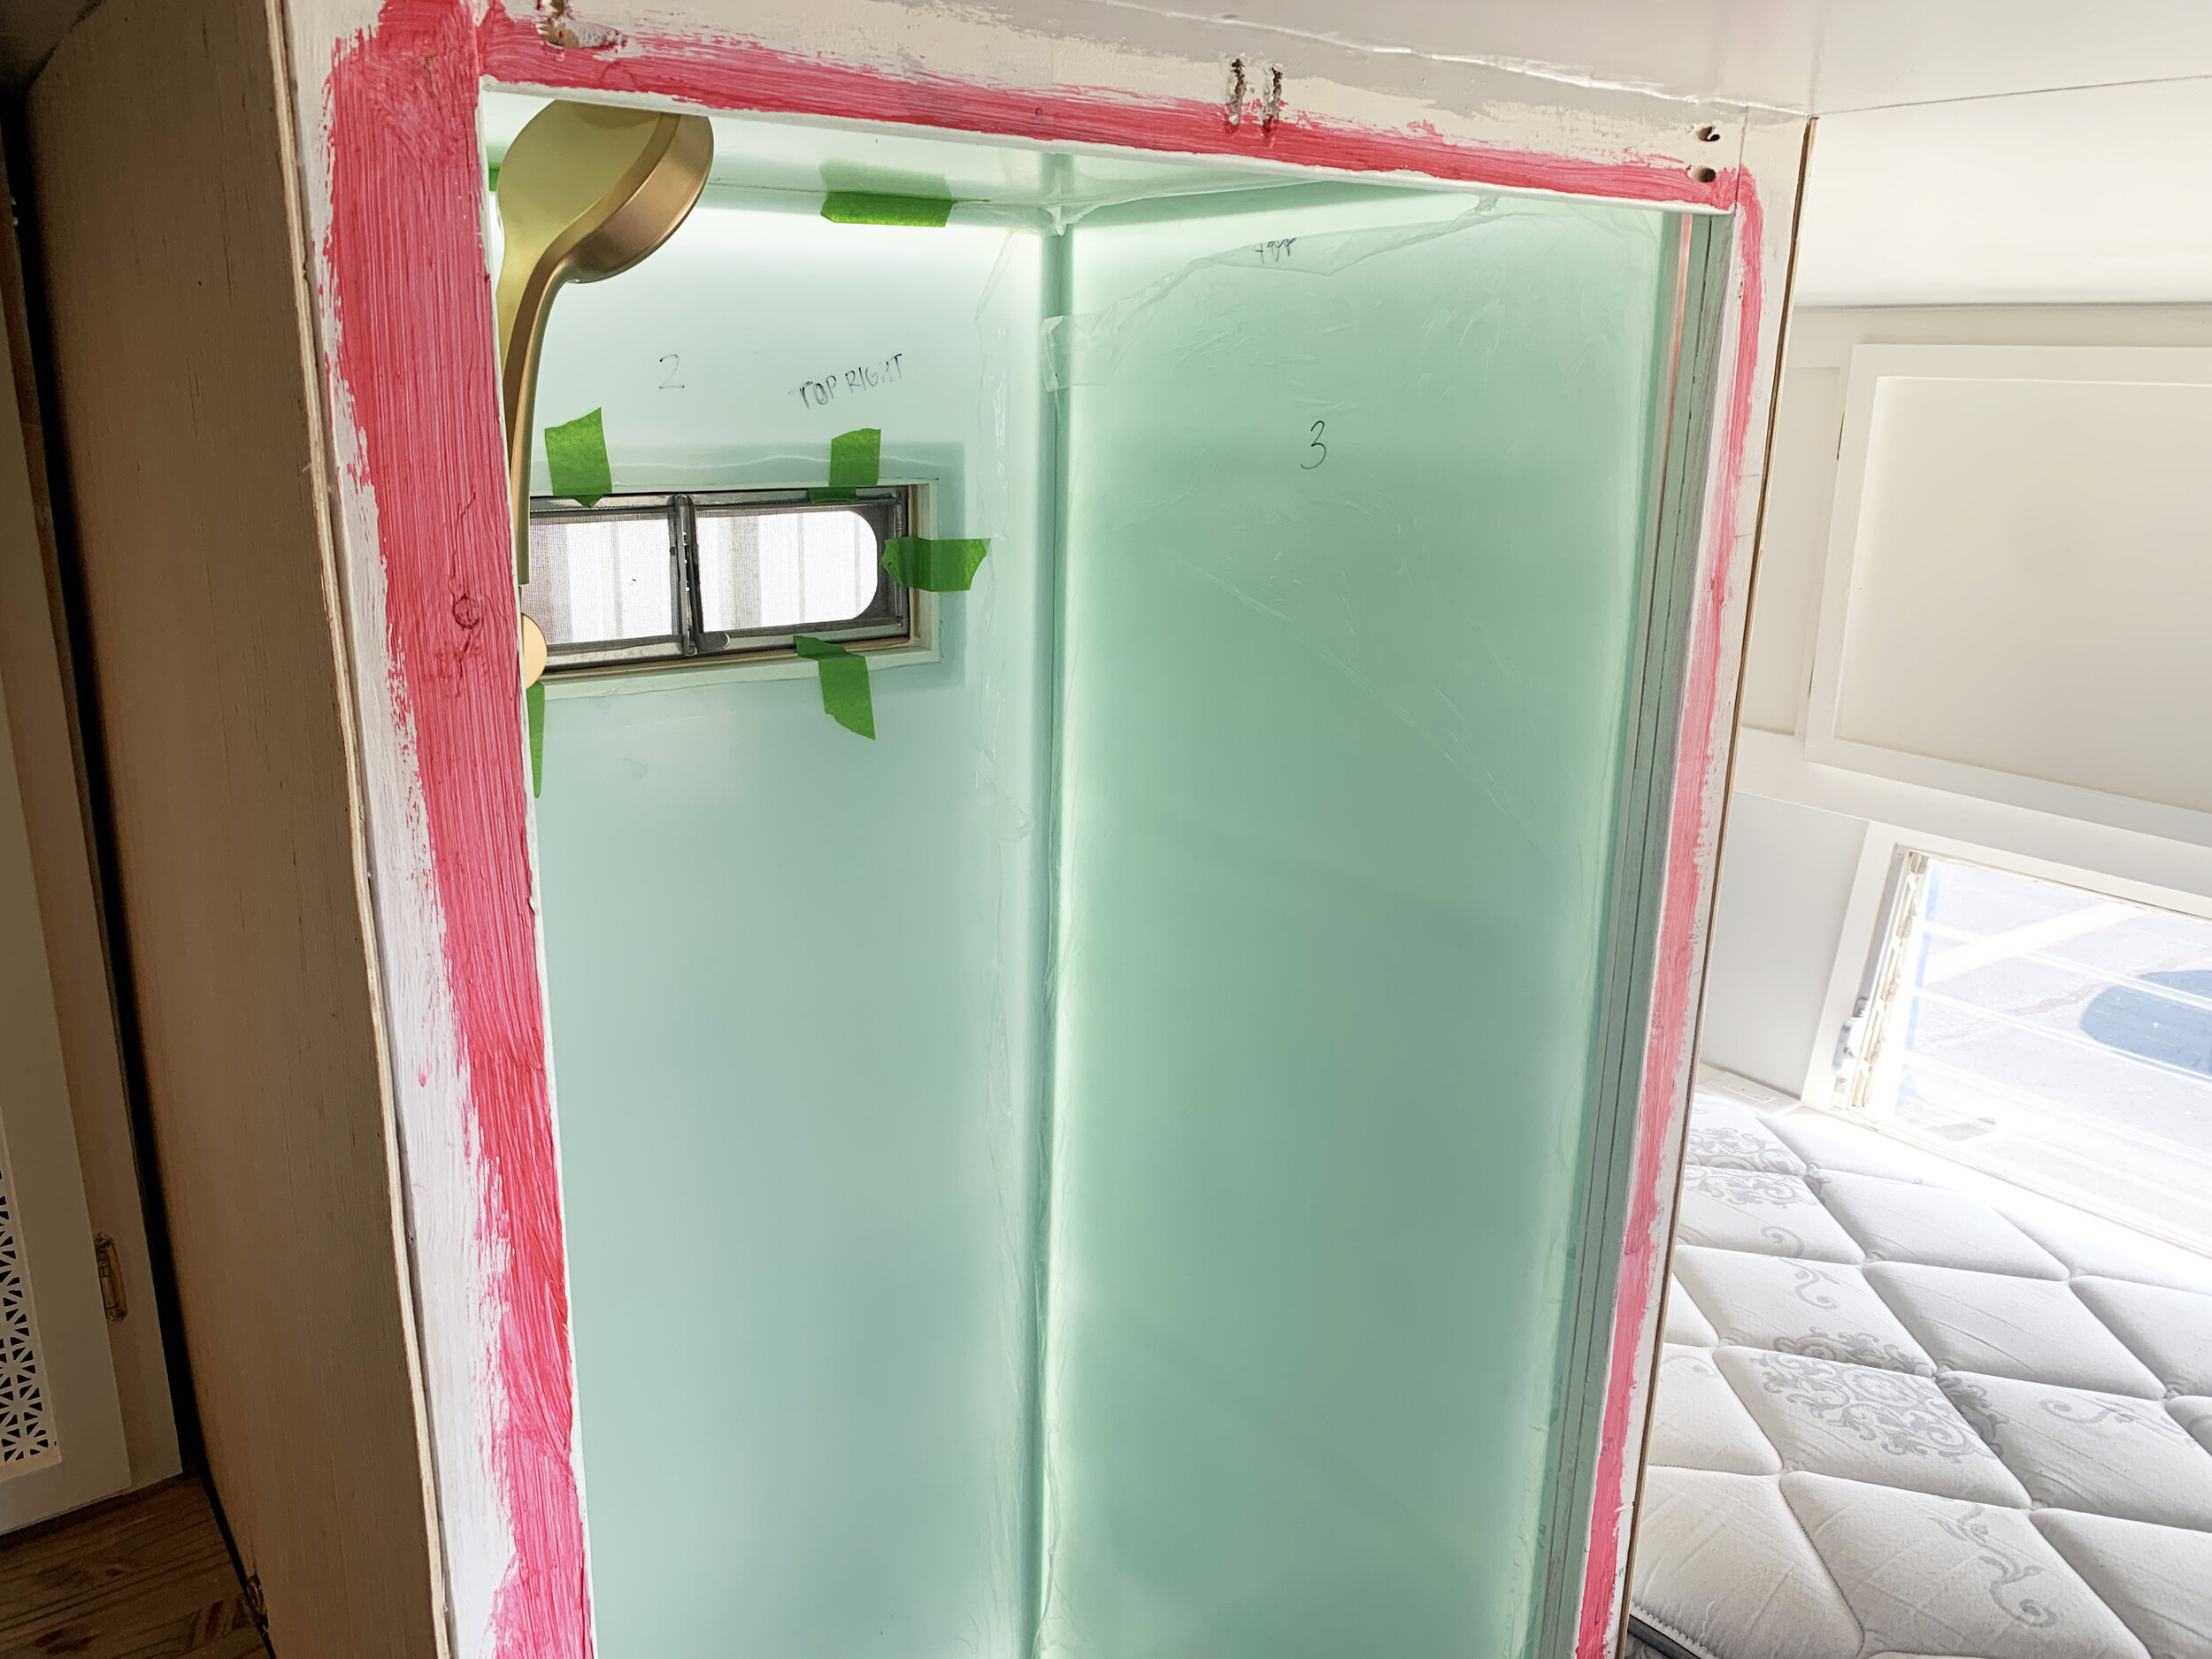
Then we piped a bead of silicone down each angled PVC support, working on one wall at a time, working carefully to make sure we didn’t get too close to the inside edge of each support. (We don’t want the silicone to accidentally squeeze out and into the open backlit space just in case it makes any weird gloopy shadows!)

A note on glowing “gloop”
One thing we – okay, I – didn’t think about and we had to deal with later after everything dried is how far out from the actual window on our PVC window supports I applied the silicone. In our case – as seen in the photo above – I got a little loosey goosey with the gun I guess and went a touch too high and wide on my silicone squiggle, which forced us to go with a heftier finish trim than planned since the silicone gloop kind of glowed as it peaked out. (You can see in a few photos from now how the silicone squiggle kind of glowed after the window wall panel was in place … but never fear! That’s why trim exists.)

We also added a painters tape rescue string of sorts wrapped around the shower head PEX line so we’d have a way to pull the threaded brass shower head (the brass drop ell) fitting in place through the correct hole while the first acrylic panel is being placed.
With silicone down (toward the outer edges of the perimeter supports and toward the inside of the window cutout to avoid “the gloop”), we carefully aligned and threaded the panel holes over and around plumbing, etc. and placed each panel in place, pressing firmly but gently on the siliconed wall supports around the perimeter only.
Important!!!
When installing the acrylic panels, don’t apply pressure without something solid behind, or very very very very close to the area where you’re applying pressure, or it WILL crack your panel.

After we installed one panel, we gently peeled up just the edge(s) of the protective film where the other panels would be touching it, so we didn’t accidentally glue/lock the protective film in place.

And remember…
Leave the protective film on the non-painted side of the acrylic panels during install and as long as possible to protect them from scuffs. (We left ours on until we installed the toilet.)
Install the panels in the same exact order you did when dry fit and cut them to size back in part 1 of this series!
The painted side of the acrylic wall panels should be the side you’re sticking down to the adhesive. You want the shiny, non-painted side to be what’s the side of the wall you can touch while taking a shower. It will protect the paint and make cleaning easier!

(If you remember back in part 1, I broke the window-wall panel when I accidentally she-hulked it trying to get it into position during the final install…
::: MEGA FACEPALM :::
Which is why in these photos you see we installed our shower fixtures on the left wall by the time I remade the window wall panel.)
With all three panels safely siliconed in place, we used painters tape to hold them in tight while the silicone dried overnight.

In one spot where the wall didn’t seem to be making perfect contact with the support along the floor, we improvised and added some pressure to it while it dried with our super heavy trailer hitch.

Waterproofing the seams
With everything dry, we used the same silicone and caulk gun to apply a small bead in all of the seams between panels and where the acrylic walls meet the tile floor. (We later followed the same siliconing process where the toilet meets the tile floor and in/around the hole where the toilet’s water supply line comes through the acrylic.)
Smooth silicone tip
For any ugly, sloppy or wonky-looking silicone seams, we used a lint-free rag and paint thinner to carefully and quickly smooth it out while still wet.

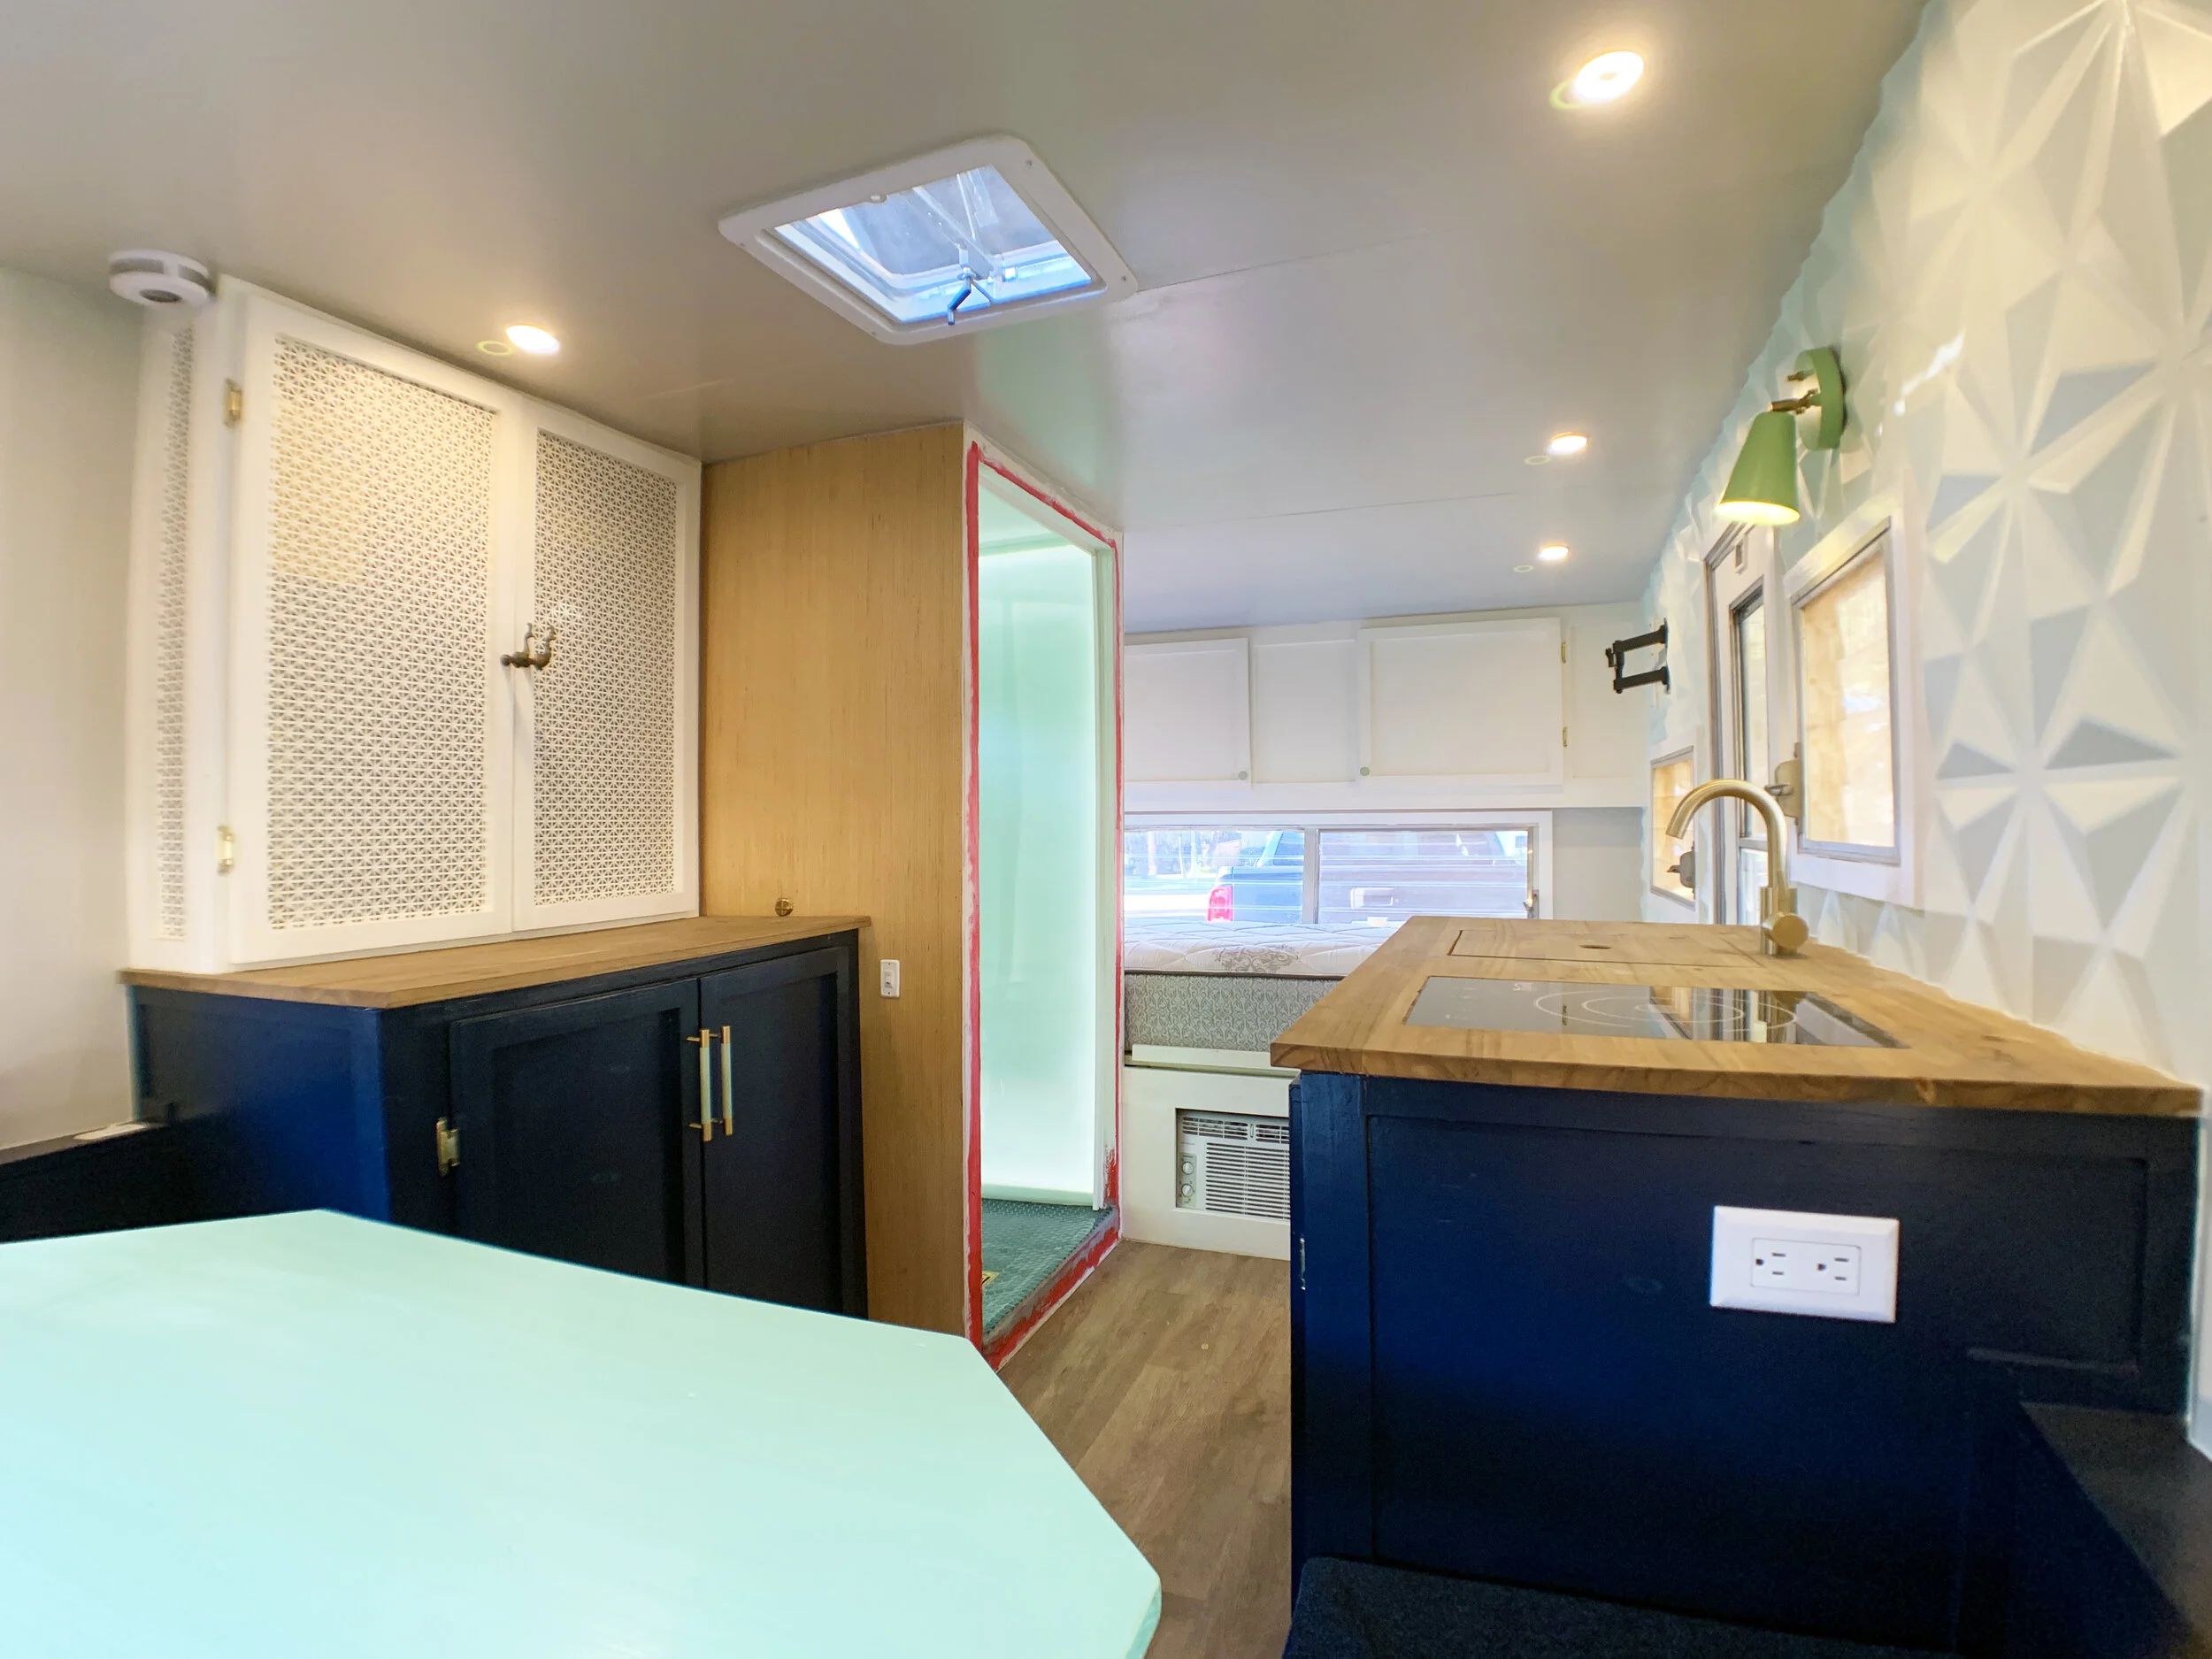
And just like that, we finally have interior, glowing walls!

I just love the way the dark teal glass penny rounds reflect up onto the glossy, light mint-colored walls, don’t you?
With all we’ve done so far in this tiny space, we still have a few more things on our list!
Coming up, we’ll be sharing how we installed the brass shower fixtures and the toilet, finished out the window, built the custom shower door, and how we added beautifully functional finishing touches to the bathroom’s tiny interior.