Rethinking Our Home Office
Now that – like a lot of us out there – I’m working from home full-time during the era of COVID, my compulsive problem-solving design brain has been trying to figure out how we can convert the rarely-used office/guest bedroom – AKA the dogs’ bedroom – into an attractive and functional at-home office space so I can finally move out of the walk space between the dining room, kitchen and living room. Not to mention Nick has computer work he has to do for his job when he gets home and the setup at the dining table is not very comfortable or ergonomic to say the least. We are (I am) ready to escape the office after hours (as much as anyone can these days) and get this office functional.
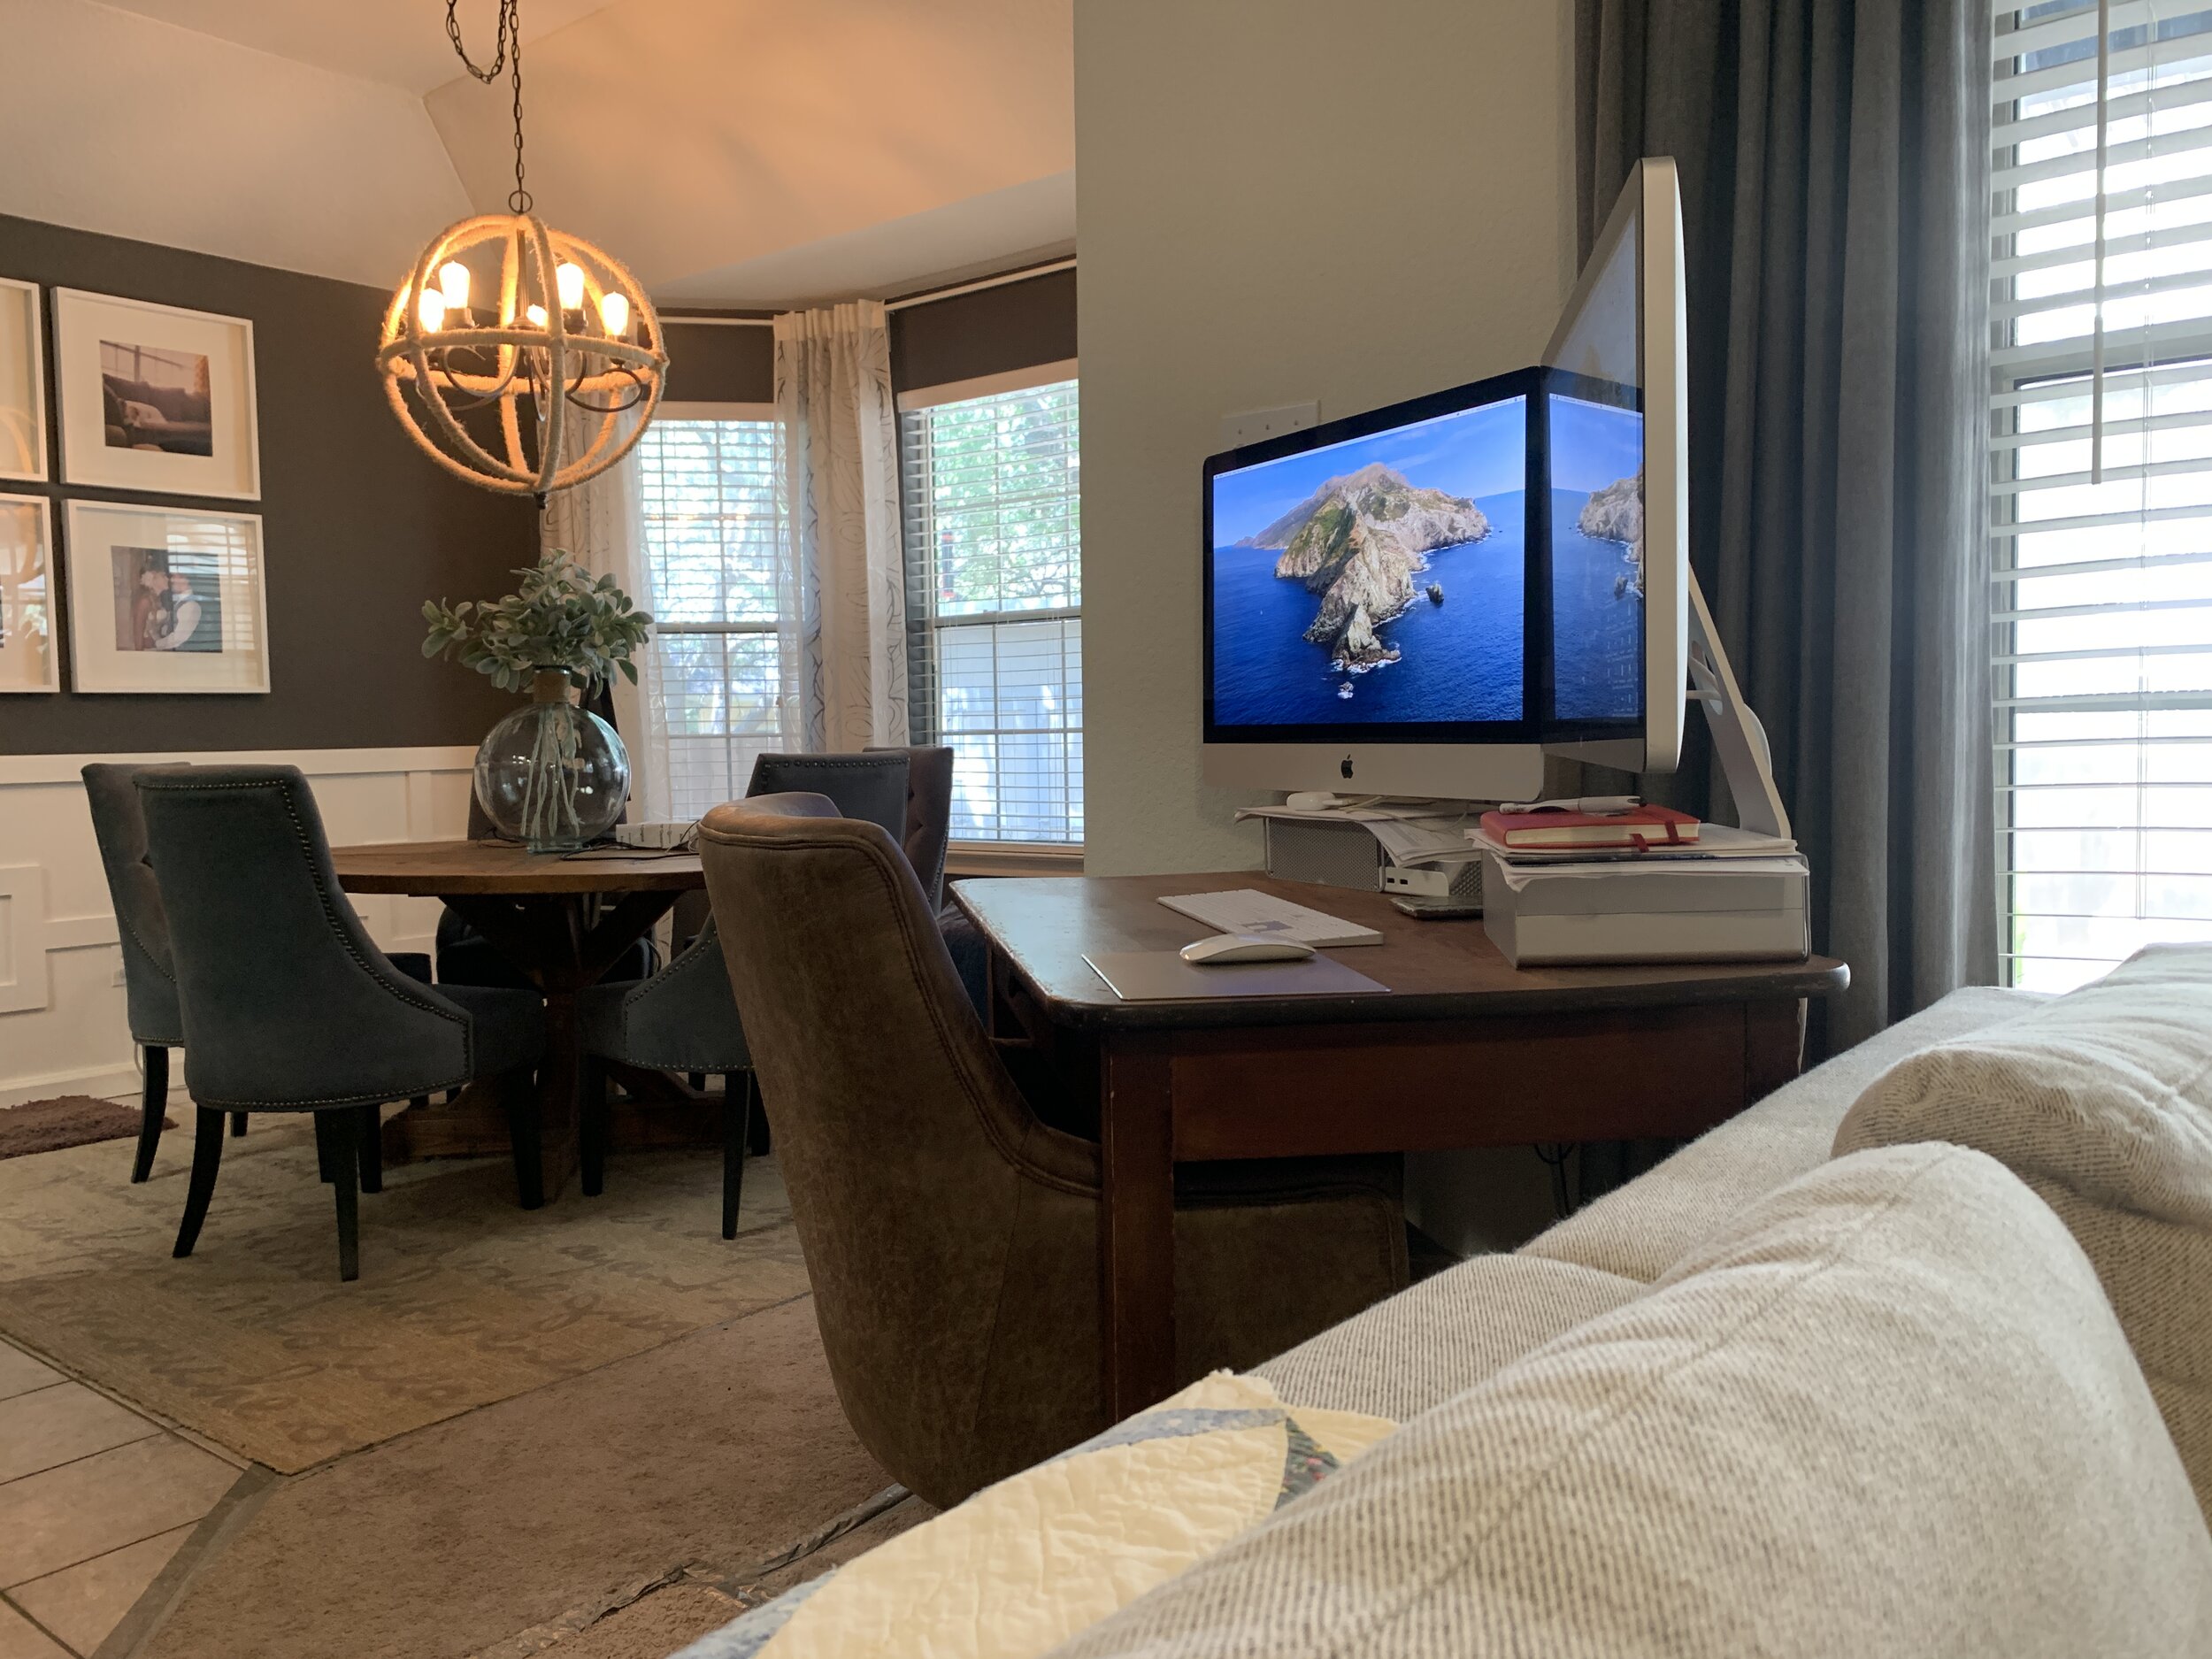
My current makeshift workspace behind the couch (and if you look closely you can barely see Nick’s monitor peeking out behind the vase on the dining table):
I’ve been anxiously looking forward to getting back to work on our own house {especially now that I’m here 24/7 and want to change all. the. things. + we’ve been spending pretty much all of our spare time (and funds) on renovating The Cameo}.
Today I’m excited to share what I’ve been thinking about that will allow us to actually use the office/guest bedroom combo as an office, hopefully without making it totally unusable as a guest bedroom (in case we ever need it in a pinch and because we don’t want to kill resale value by making it a permanent office only). You can see in the floor plan below how much is unusable walk/door swing space.

At just over 130 sq. ft., it’s a decent size bedroom in the front of the house, and though it has an eyebrow-arched window that faces the front yard, it feels fairly dark and doesn’t really have one full wall of uninterrupted space between the doors and window placement. (It has a set of double french doors off of the entry, a single closet door and a door that leads to the guest bathroom, other guest bedroom and if you’re food-minded like me, the kitchen.)
It’s always been the room in the house that’s the afterthought, partly due to all the doors, but also because we’ve not really needed an office or a second guest bedroom since most of our family lives in town. It’s the island of misfit toys, so to speak, where everything not in a proper location and not in season goes to be out of sight. (Which is kind of funny and backwards considering it’s the first room in the house that you see right off of the entry … so it should be one we want to look stellar. But I digress…)


Those photos were the list pictures from before we moved in, but here’s how it has been looking more or less for the past 8 years. (You might remember these from our home tour a year ago.)
Here’s what it looks like when you walk in and turn left from the front door:


Right now it’s extra unappealing because (if you haven’t already noticed) we’ve temporarily broken down the queen bed to be lower and have miscellaneous carpet remnants duct taped to our glorious ‘90s tile floor.
{Shout out to our local Lowe’s! We made a grippy low-budget runway throughout the house for Maximus’ knees (he’s our fluffy white pup in these pictures). Already this year he’s had both knees repaired after tearing both cruciate ligaments. He’s doing great now – thanks for asking!}


So yeah … it’s safe to say a makeover for this space has been long overdue.
The makeover plan
What’s got to go
The fan – I hate the fan in this room. It’s been on my to-do list since we moved into the house 8 years ago, but we’ve had more important design fish to fry so it’s still up there since it works fine. We will still need a ceiling fan because, Texas, y’all.
The colors – Not feeling the purple on the walls or cinderblock-blue-gray on the ceilings. Not sure what design vision I had when we first moved in and painted this room, but it’s safe to say our tastes have changed.
What’s got to stay
The room’s overall architecture – we will not be removing any of the 4 doors, knocking out any walls, raising the ceiling or moving the window.
The floors – for now… [insert evil laugh]. I cannot wait to maybe one day swap out all of the ceramic tile throughout the house for something more modern and homey, but unfortunately today is not that day. (Also, I’m pretty sure our glossy tile floor is why we are 4 for 4 on dog knee repairs…)
The rugs and curtains – these don’t really have to stay, but I just love them and am really (still) feeling the green. Though they’re the newest additions to the room, I got the rug and velvet curtains years ago when my lean toward green began. Since then, the obsession has only grown as you’ll soon see.
Our home office inspo
Right now I’m really diggin’ moody green vibes for this space (and let’s be honest most spaces in the house). Plus beautiful wall moldings, aged brass, warm woods, plenty of storage, and maybe some wallpaper if I’m feelin’ squirrelly. I’m not sure quite yet the exact mix of elements or pieces we’ll end up with, but here are some visuals of what overall vibe I’m thinking.
Inspiration space 1
One of my most favorite offices, Thrifty Decor Chick perfectly combines the colors, form and function I’ve been envisioning for a while now. I love the moody – almost neutral – forest green, subtle graphic pattern, brass and wood mix. And I don’t know about you, but this gal LOVES herself some storage, and especially hidden (or as I like to call “ugly”) storage.

Inspiration space 2
This dark and luxurious wall molding from Studio McGee makes my design heart go pitter patter. It’s bold and rich but the room still feels light and bright overall. It’s got that balance of traditional meets modern that suits our house and our style. The high contrast colors, touch of marble and the perfectly worn wooden double-desk situation? Not sure there’s a more striking combo out there.

Inspiration space 3
Okay, yes I know it’s not green … but this black + wood built-in wall with mesh brass door fronts from Ashley Webb Interiors is absolutely kill.ing. it. So dramatic, yet not too dark and not at all overbearing. LOVE.

I’ll take one of each, please.
Okay, now that I’ve wiped the drool off my chin, let’s get back to our reality and figure out the best layout in the room o’ doors.
Possible floor plans
The awkward abundance of swinging doors (4 total!) make the space challenging to layout, so I’ve come up with a bunch of options for furniture arrangement, since the limited layout will definitely dictate what type of wall moldings and built-ins we can do, and if we build in storage, that’s the first place we’ll have to start.

Office Layout 1 – floor-to-ceiling built-ins on the window wall with base deep enough for printer storage, a queen bed and a free-standing desk across from it

Office Layout 3 – floor-to-ceiling built-ins on the window wall that wrap around the corners, a queen bed and a built-in desk complete with floor-to-ceiling storage

Office Layout 5 – floor-to-ceiling built-ins on the window wall with base deep enough for printer storage, a sleeper sofa and a free-standing desk across from it

Office Layout 7 – floor-to-ceiling built-ins on the back wall with a removable desktop in place resting on decorative wall molding, a free-standing desk in the middle of the room and a sleeper sofa with TV above it

Office Layout 2 – floor-to-ceiling built-ins on the window wall that wrap around the corners, a queen bed with access to a built-in nightstand and a built-in desk complete with floor-to-ceiling storage

Office Layout 4 – floor-to-ceiling built-ins on the window wall that wrap around the corners, a queen bed and a free-standing desk across from it

Office Layout 6 – floor-to-ceiling built-ins on the window wall, a sleeper sofa and a built-in desk complete with floor-to-ceiling storage
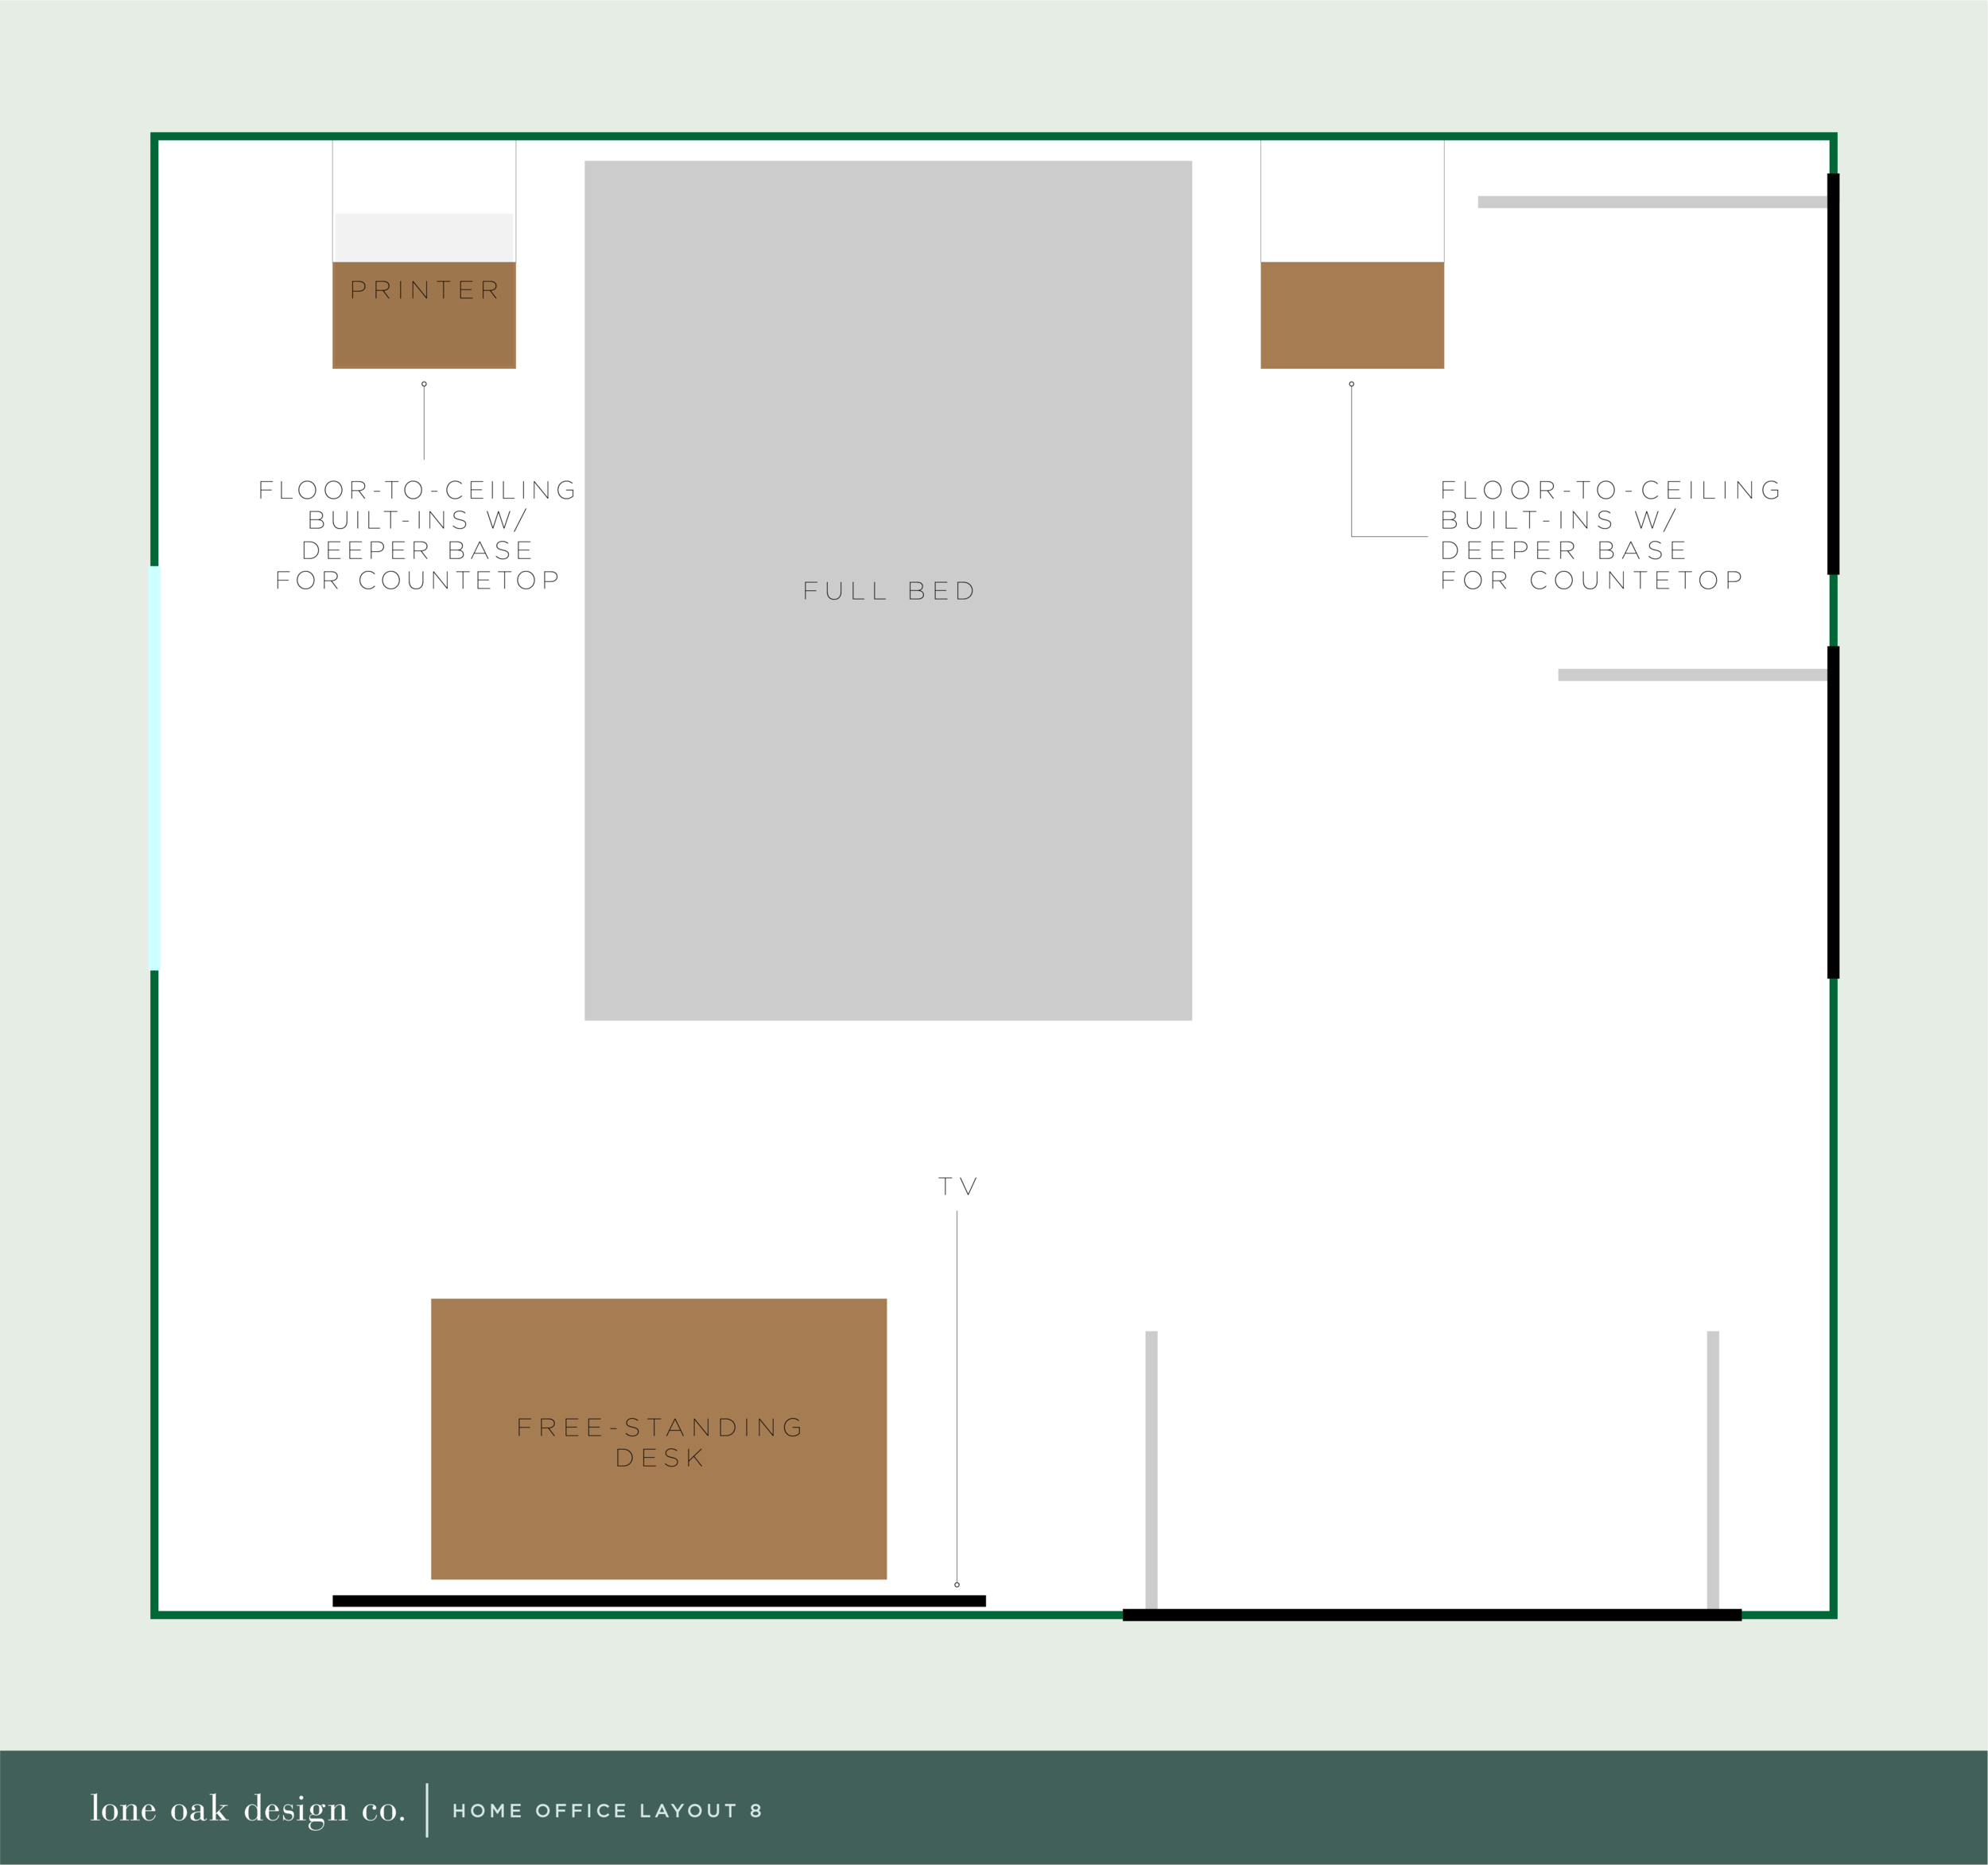
Office Layout 8– floor-to-ceiling built-ins with incorporated nightstands on the back wall with desktop removed and full-sized queen bed in place and a free-standing desk with TV above it
All of the layouts above are separate from one another – except layouts 7 and 8, which would allow us or future homeowners to easily convert the room from an office (with a sleeper sofa) to a bedroom (with a small free-standing desk on the side) depending on the need. They would be the same layout with the two built-ins (up top in each layout) and would allow us to remove the desktop along the wall in layout 7, sub in a full-size bed instead and use the two built-ins that were flanking the desktop as nightstands as seen in layout 8.
So that’s it (for now) folks! We’ve just scratched the surface of this project, and you better believe we’ll be updating the blog with our room progress over the next few months or so while we hopefully finally start tackling this room. (If I tell you we’re working on it, it means it will finally happen … right?!)
If you’re not already following us on Instagram, you totally should because we’ll be sharing our progress on this (and all) projects as we go.
What do you think about the vibes for this room? Any color/design feedback? What’s your favorite room layout? I’m soooo excited and ready to get this show on the road already!