The Cameo Camper Renovation: Plumbing a Vintage Camper from Scratch
This is a pretty meaty topic that unfortunately we haven’t found very comprehensive info about (at least not in the detail we were looking for) so we definitely wanted to share everything we did for anyone else needing to do it all from scratch. What we’ve most found is how to fix already-installed modern RV parts – which often have very different dimensions and all those fun hidey-holes between the interior floor and the underside of the camper where, I assume, many a magical thing are housed – or smaller and often simpler camper van conversions, which are different than what we’re needing/wanting.
Here we’re going to cover generally how the system works so you can get the basics down, plus details about our specific setup so you can see the on-paper plumbing “theory” in practice and how even though it can look a lot more complicated in reality, it basically distills down into supply and demand – water in and water out.

The basics of how a camper water system works
It makes the most sense to me when I break down the water system into sources (or supply) and uses (or demand). For the bulk of this post, we’re focusing on the fresh water tank and how to get water to our fixtures – the kitchen sink, the bathroom, etc. (And then later we’ll get into where the used water and waste go once you’re done using it, and we’ll break out more detailed posts on the gray water and black tank connections and fittings.)
Sources

Here a garden hose held up to our gravity-fill port on the left fills up our fresh water tank. Using this port, the fresh water tank could also be filled with a water bottle, jug, etc. and is what is used when we’re not hooked up to a continuous feed of water like at a campsite pedestal – it requires a water pump to push tank water to our fixtures.
For a continuous pressurized water source, we use the port on the right, which bypasses our fresh water tank and pump completely.
In a camper, there are 2 sources of water (i.e. water coming into your camper):
Pressurized city water (your house’s hose, water connection at campsite, etc. – tightly and always screwed into the pressurized water “in” port)
This bypasses your tank entirely since it is a constant pressurized feed of water, so you do not need your pump to push water to your fixtures/uses. This is essentially how the water at your home works.
Gravity-fill (a pitcher, your house’s hose temporarily used to fill the tank before you leave the house to go boondocking, etc.)
Think of this like your emergency fill - if you ran out of water you’d be able to fill your fresh water tank with a water bottle/a non-pressurized source out in the middle of the desert.) This requires a separate pump be used to suck the water out of the fresh water tank, pushing it to your uses.
Some important notes about gravity-fill in + the tank connection:
Like the name suggests, it uses gravity to feed the water into the tank, so the exterior port needs to be higher than where it enters the tank, and the tube in between can’t have any low spots or water will collect there.
The water should enter the tank as high as possible, ideally on the top of the tank (or as high as possible on the side of it) – your fill capacity relies on the placement of this fitting. For example, if you have a 50-gallon tank, but place your fill fitting on the side halfway up the tank, the storage capacity of the tank is really only about 25 gallons.
Uses

A kitchen sink is just one example of a water use you might have in a camper. Some others might be a bathroom sink, shower, toilet, exterior water spigot for rinsing off, etc.
If you plan to have running water in your camper, there will be at least 1 use for the water that’s coming into the camper. Uses are the locations/how you plan to use the water. You may have more, you may have less, but the principle stays the same.
We have 4 uses in our camper:
The kitchen faucet
An exterior water spigot by the door for cleaning of our feet, etc.
The shower
The toilet – note: if you have a composting toilet, it doesn’t need water run to it
The other stuff the fresh water tank needs
In addition to the two water sources and one or more uses, the fresh water tank also needs an air vent tube. This is necessary because as the water level drops (when you use your sink, e.g.) the volume the now-used water took up in the tank needs to be replaced by air. This tube also doubles as an overflow if you over-fill your tank (letting you know your tank is at maximum capacity).
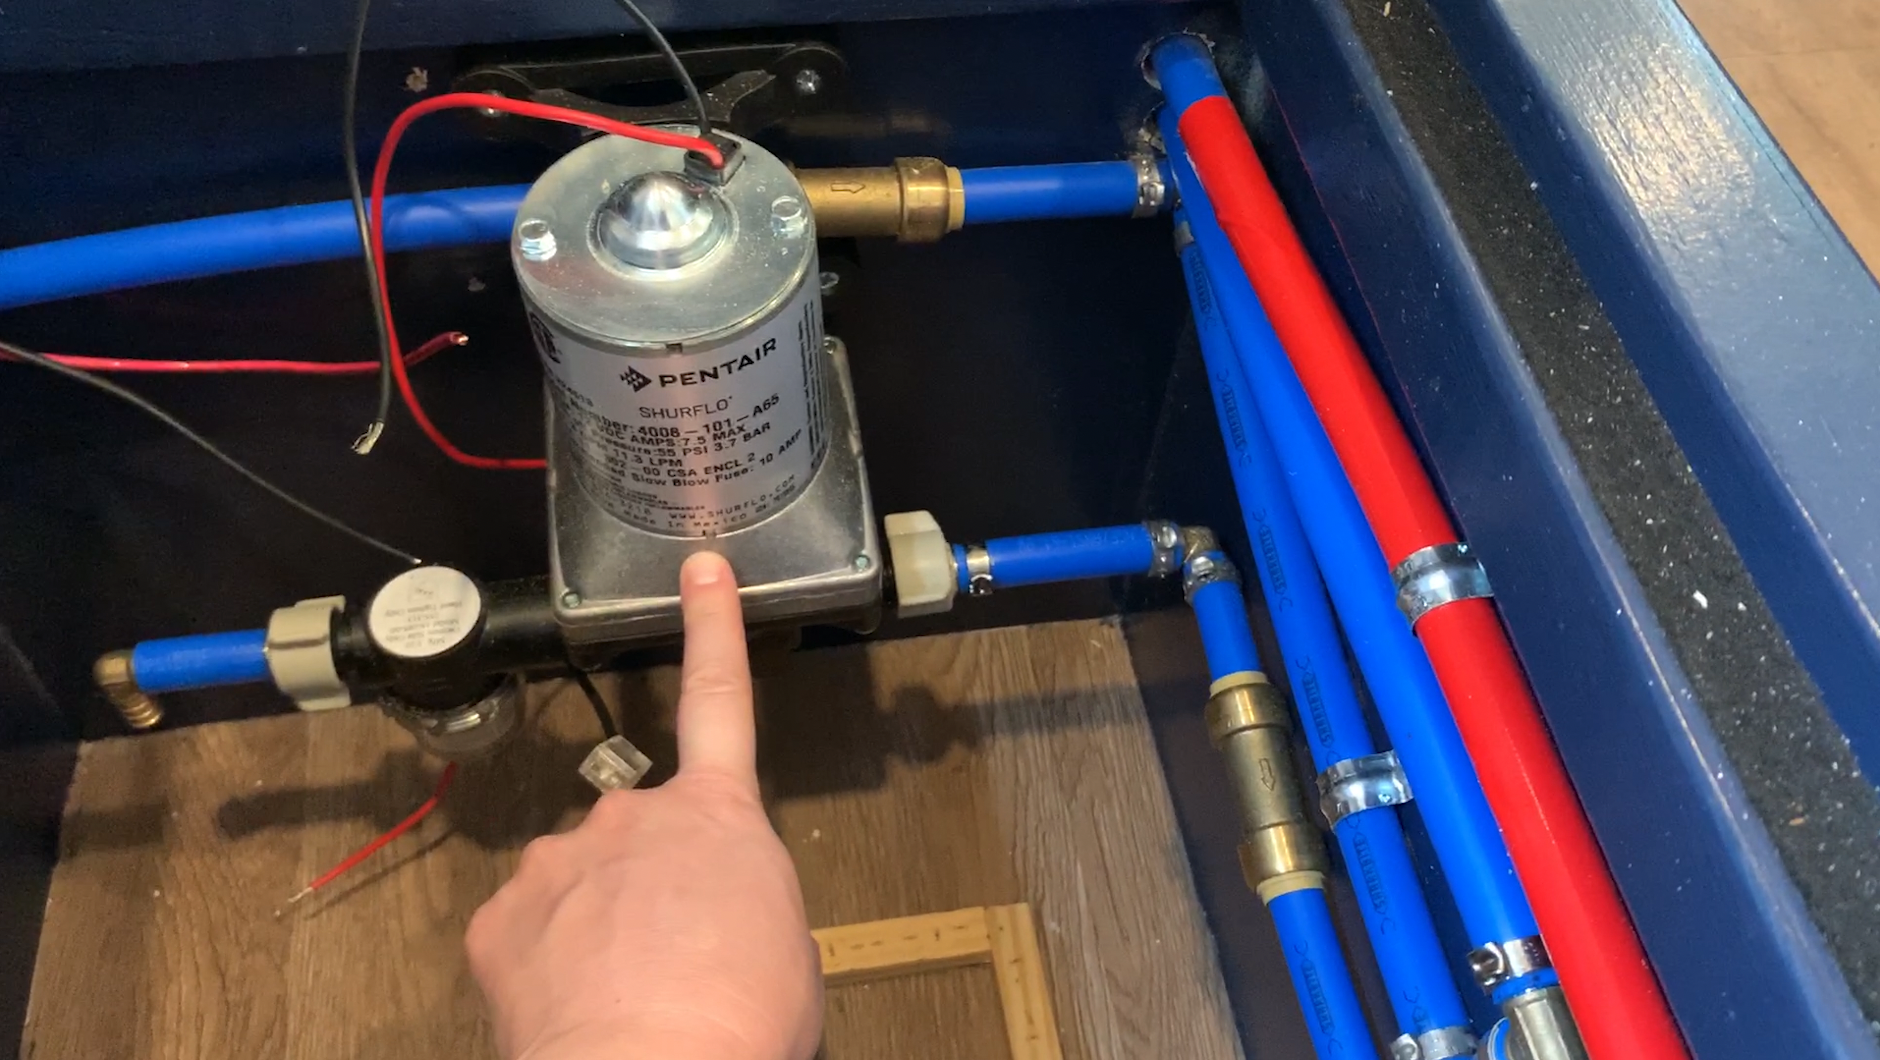
The last fitting the fresh water tank needs is a water-out port that connects to a 12V pump. This should be placed on the side of the tank as low as possible so water can be continuously pulled as the water level drops. (If it was high on the tank, once the water level gets lower than the pump port, it would pull air and not water, rendering any water below it unusable.)
Optional (but highly recommended) is a drain that allows you to completely empty the fresh water tank beyond what can be pulled out by the pump and used by one of your uses. Ideally this would be installed on the bottom of the tank and exit through the floor, with a valve you can easily access underneath the camper to open and close as needed.
Our complete water system diagram
Here’s the full plumbing plan with all the basic parts needed to complete a functioning camper plumbing setup. If your camper is anything like ours it will require many more bends, PEX connectors and cuts just to make all of the necessary parts move compactly through the furniture, etc., not to mention in real life you’re working in a 3D space which adds the need for more bends/elbows/fittings etc. to move every direction through the space.
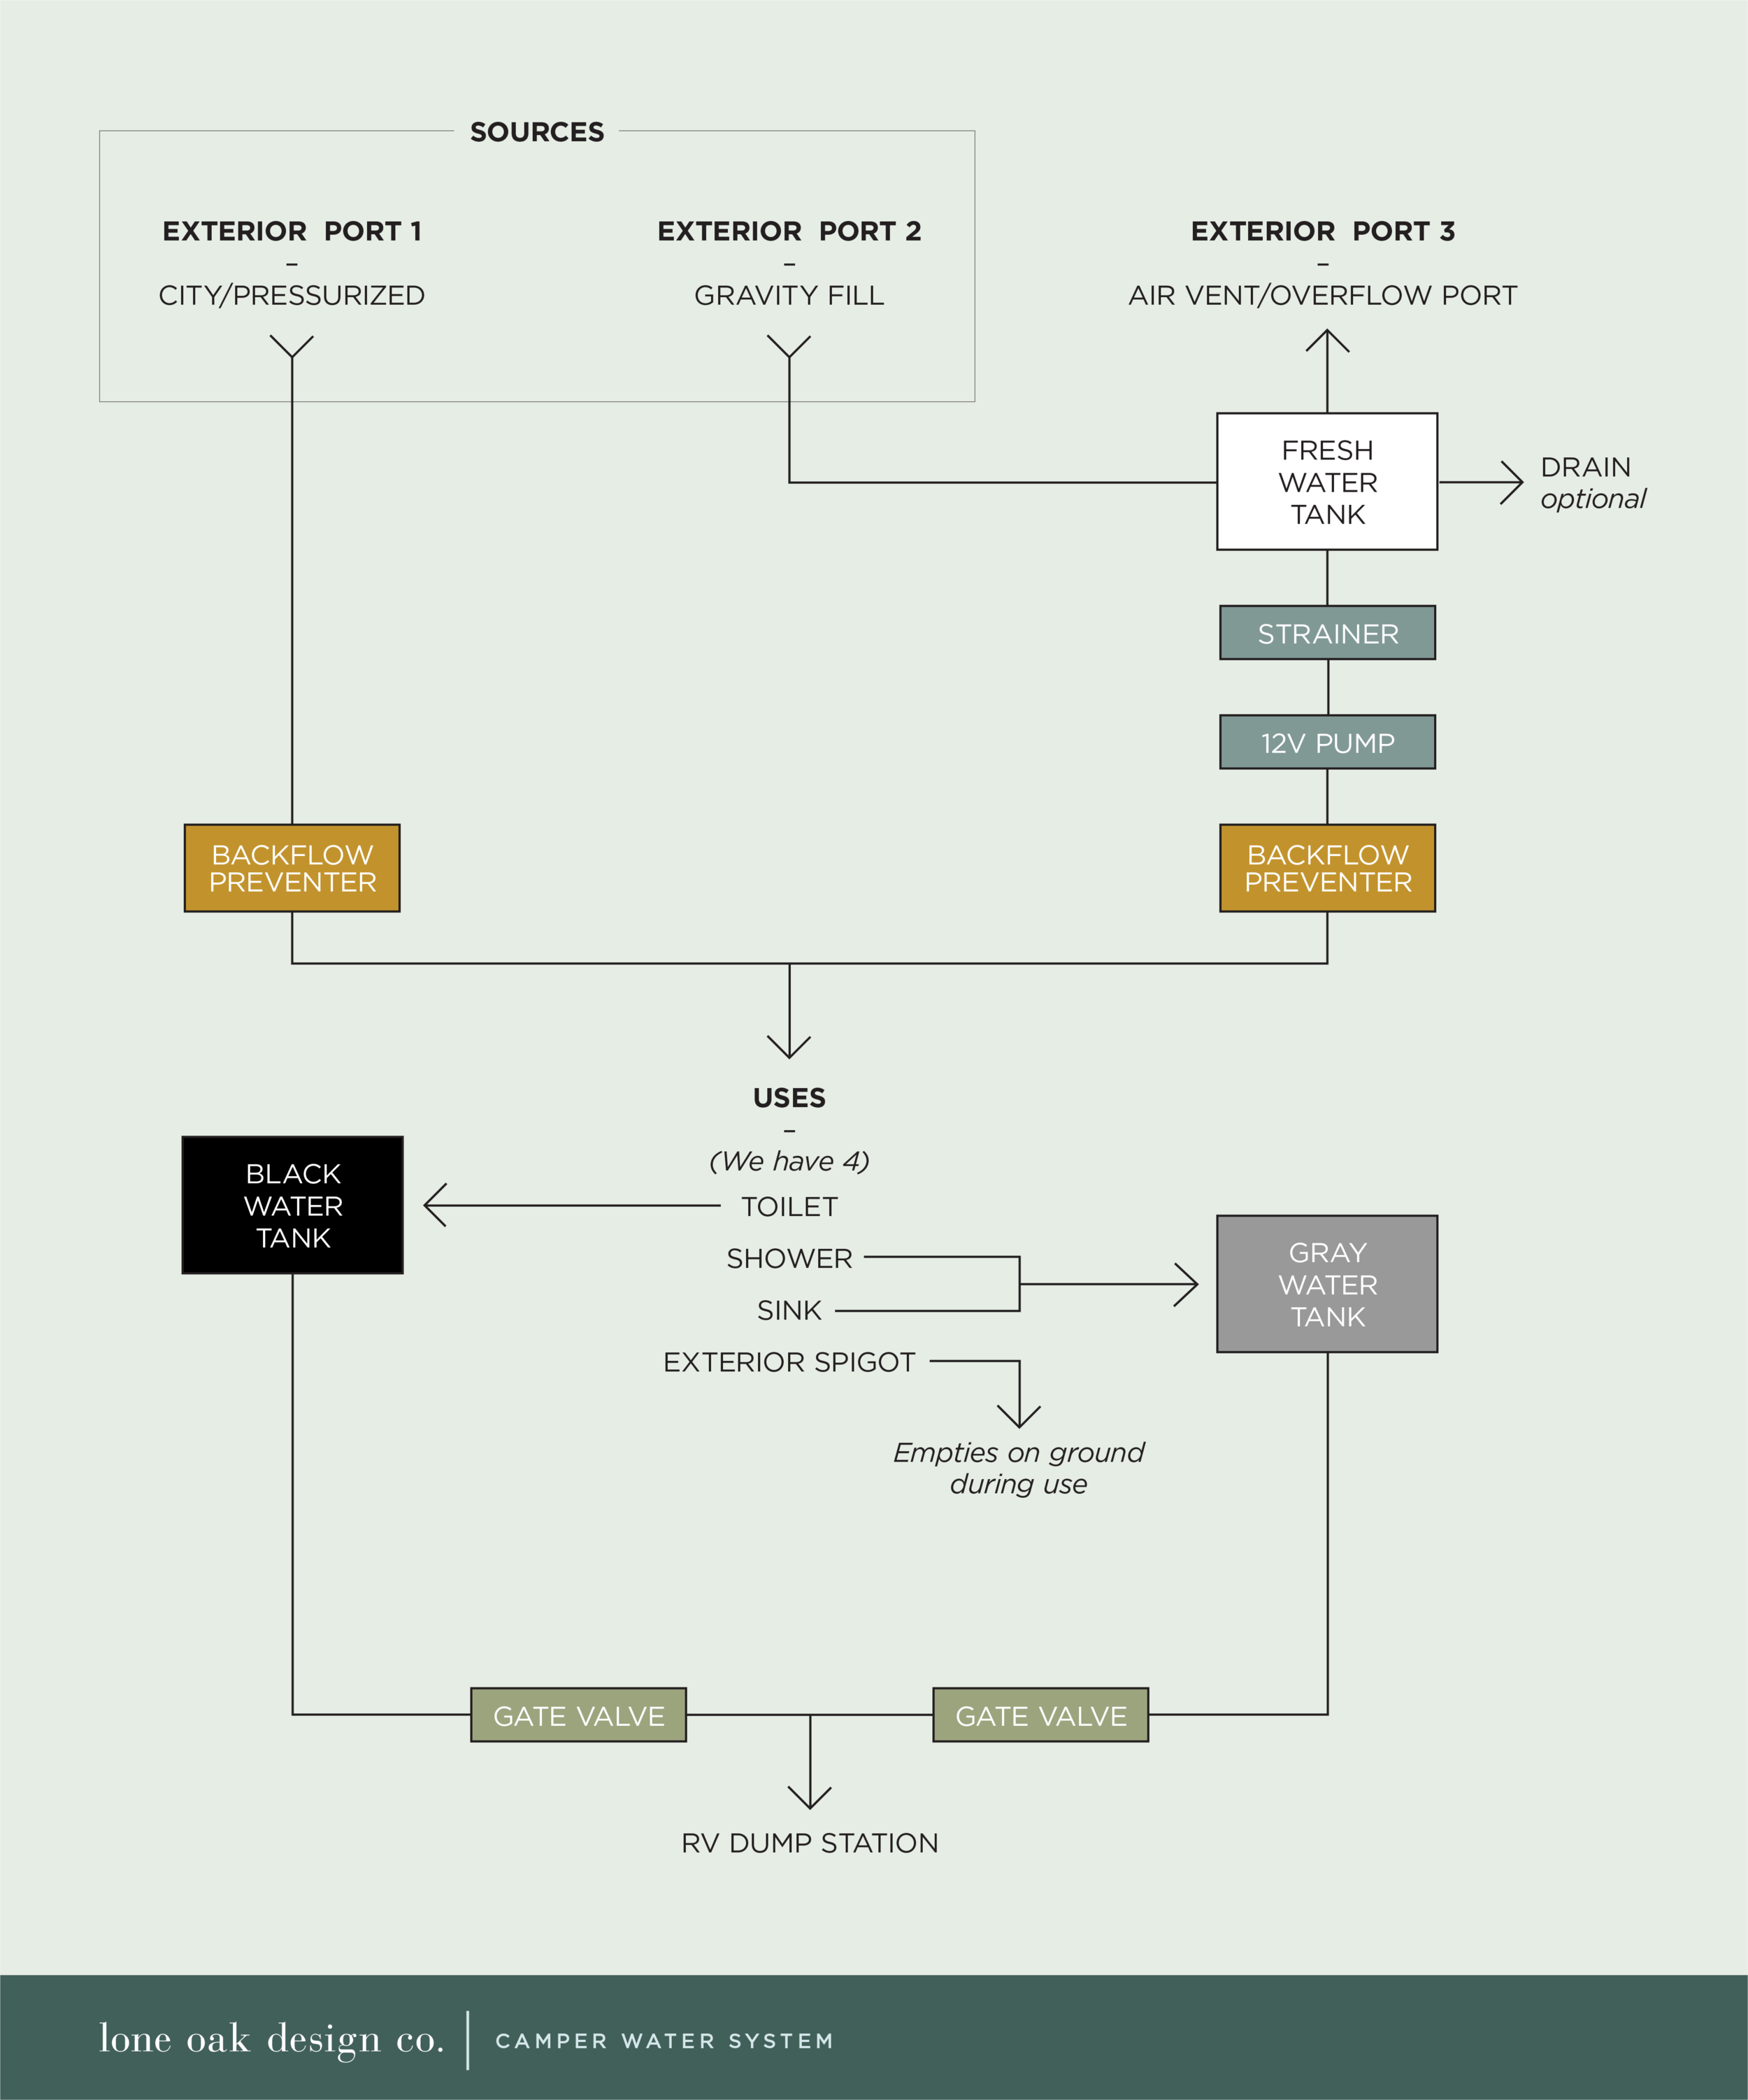
We also have a water heater – not shown in the diagram above since it’s not necessary to the system’s overall function and is just an added luxury – that acts as an intermediate step between the backflow preventers and the shower + sink (shown). Our setup requires a blue/cold supply line (coming in from the single line shown after the backflow preventers) and a red/hot line coming out of the red water heater port with a T-connector that splits off to the shower and the sink (and any other uses you have where you want hot water).
Fresh water system tour
Here’s a walkthrough of what you see in the diagram above, in reality. It looks more complicated (and kind of is) since we’re going from a flat 2D space to a tight 3D space where we are going through walls, through tanks on multiple sides, and up and around and through furniture.
Please note: At 5:17, I say uses when I mean sources, and sources when I mean uses.
Water coming from the tank – before it funnels down – are the water sources, and then the water lines branch off again after it funnels down to go to our uses (shower/bathroom/water heater and kitchen sink).
Our water system shopping list
(This does not include our gray and black tanks and fittings, water heater, sink and bathroom pieces. This list only includes what is needed to get water into the camper and pushed out toward the different areas we have, plus the pieces needed to drain the tank completely through the floor.)
Exterior water inlet(s) – we got a combination port that houses the city pressurized port, gravity fill port and air vent/overflow all behind one door we painted navy so it blends in, but each can be done separately as well depending on the look you’re going for.
Fresh water tank with pre-placed spin weld fittings – we got this one. We tried other things and just take our word for it and plan ahead. Figure out exactly where you need all of your tank fittings to go and custom order it from the get go. Do not try to attach your own. Just trust us on this.
Strainer for water pump – to protect the pump from any debris/particles that might get in the tank
1/2” PEX tubing – the amount will vary depending on the size of your camper, distances the lines need to run, etc. It also comes in different colors (red, white/clear and blue). Because we needed more than 10-foot runs and not more than one roll, we opted to just go with blue (the majority of our lines are cold/neutral temperature) and tape our hot lines with red duct tape as needed (mostly for educational purposes to show you what is cold and what is hot in our photos/videos).
PEX cutter tool – for 1/2” PEX
PEX clamp rings (or quick connects) – I’m guessing we used around 100 rings, maybe a little more? The amount of clamps needed depends on the amount of connections you have. We pretty much needed 1 ring for each cut made in our PEX. (A few PEX lines went into quick-connects which don’t require the clamping rings, but for us that was the exception, and we tried to use the quick connects sparingly since they are way expensive, comparatively. We figure the quick connects are more for repairs since they’re so pricey, but the plus side to the quick connects are if you mess up, you don’t waste the fitting, the ring, and the PEX tubing it’s connected to, unlike with the PEX clamp rings.)
3-handle 3/8”-1” PEX clamp tool – for crimping rings around connectors
1/2” PEX connectors – so. many. connectors.
1/2” x 1/2”elbows – part #UC248LFZ for the single or part #UC248LFA10 for the 10-pack – (we used 24)
1/2” x 1/2” x 1/2” tees – part #UC362LFZ – (we used 3)
1/2” PEX disconnect clip – removes the push-to-connect type of fittings (like the backflow preventers/check valves and PEX-to-threaded ABS adapters) without damaging the pieces
1/2” vinyl flex tubing* – for the air vent/overflow and drain. *Not to be used for pressurized water lines
1-1/4” vinyl flex tubing* – for the gravity fill inlet – ordered by the foot (“Qty” is the number of feet needed). *Not to be used for pressurized water lines
Stainless steel adjustable clamps – for flex tubing – 2 crimps needed per section of tube
We used 5 clamps for our 1-1/4” tubing (you can see in the video we double clamped the tubing on the back of our exterior port which explains the odd number of clamps) and 2 clamps for our 1/2” tubing
Flathead screw driver – to tighten adjustable clamps for flex tubing
1-1/4” barb x 1-1/4” barb elbow* – to bend the gravity-fill in tubing at a 90-degree-angle. *Optional: You might not need this. Because we dropped our gravity-fill in with an elbow and needed to go back from vertical to horizontal, we needed this additional piece to connect two different sections of our vinyl flex tubing.
Various threaded-to-flex tubing adapters
1/2” barb x 1/2” MIP adapter* – for connecting the air vent/overflow tubing to the top of the tank – part # VTS-591D – (we used 1). We used the 1/2" Elbow Barb X 1/2" MPT; *you may want the 1/2" Straight Barb X 1/2" MPT adapter depending on how much room you have above your tank.
1-1/4” elbow barb x 1-1/2” MPT* – for connecting the gravity-fill in tubing to the top of the tank – (we used 1) – We used the 1-1/4" Elbow Barb X 1-1/2" MPT; *you might want the 1-1/4" Straight Barb X 1-1/2" MPT depending on your setup on top of your tank.
Various PEX-to-threaded ABS fitting adapters
1/2” x 1/2” MNPT male adapter – part #UC120LFZ – (we used 3 – 1 for connecting our drain to the tank and 2 to connect the hot and cold PEX lines to our sink’s water lines)
1/2” x 1/2” FNPT elbow female swivel – part #UC532LFZ – (we used 3 – 1 right behind the exterior water-in port to bend our pressurized city PEX line down into our bench’s backrest and 2 for connecting to the water heater)
1/2” x 1/2” FNPT female adapter swivel – part #UC526LFZ – (we used 3 – 2 for either side of the water pump and 1 to connect to back of the toilet)
1/2” CTS / 1/2” NPT Aqualock push-to-connect male adapter* – part # VTS-733 – (we used 2 to connect our fresh tank fittings – the drain and out port to the water pump – to 1/2” PEX pipe). *Note: we bought “the same thing” from Lowes and it was smaller for some reason. Vintage Trailer Supply is the only place we found one that is the size we needed.
1/2” PEX ball valve – for the fresh water tank drain – part #22461LFZ – (we used 1 under the camper floor for our tank drain)

Some other things you might want/need to have on hand
PEX caps – not really needed, but good to have on hand to test before you have everything waterproofed or if you have an emergency.
Note: These ones we used cannot be reused so you have to cut off and trash at least a couple inches or so of PEX tubing attached to it.
These caps can be reused since they’re the push-to-connect style.
Additional connectors – elbows, T-connectors, rings, adapters. If you’re like us you will need more than you think.
More plumbing stuff to come
Since there are so many (related, but different) parts to plumbing a vintage camper from scratch we’ll cover it all in upcoming broken out posts, like:
A how-to on plumbing connections – PEX fittings, flex tubing and the tools and tricks we learned during our installs
Powering and protecting the 12V water pump
Plumbing our kitchen sink
How we attached our own watertight tank fittings – complete with two fails and what definitely not to do
Installing our water heater tank
Plumbing the toilet
Plumbing the shower
Installing a hidden exterior water spigot
Building our wet bath from scratch – which will include making a custom shower pan/bathroom floor that can be used in a flexible moving space, waterproofing the interior, lighting the space and plumbing the toilet and shower drains to go to the black waste and gray water tanks housed underneath the floor.
I hope this all makes sense. It wasn’t until I thought to break it down and simplified it into sources and uses that it finally clicked for me where I could separate all of the different water lines. We’ll cover a lot more in future posts (until the entire picture is complete), but please let us know if you have any questions (or thoughts) in the comments below. We know the plumbing can be overwhelming, especially at first and when you’re trying to cobble it together from different places. We hope to be a great comprehensive resource for your from-scratch camper water system!